

Task Scheduling in Linux Using Cron Jobs

Dedicated full-stack .NET developer and software consultant based in Noida, India. Proficient in crafting robust solutions using ASP .NET Core Web API, SPA, Azure cloud services, minimal APIs, and microservices. Passionate about building products that drive business success and personal growth.
Hello, This is Kandy. In this blog, We are going to cover what are Cron Jobs and how we can schedule tasks on Linux using Cron. So let's get started.
Let's consider a scenario, We have a web application hosted on our production server and as a System Admin, you were assigned a task to take a daily backup of the LIVE database. In case there is an accident or some cyber attack which results in loss of data, We can quickly restore our database so our application could continue to run smoothly. As we can tell, it is a tedious and repetitive task. Doing it manually would waste a lot of time and as a System admin, you have other problems to resolve and other tasks to complete.
This is one of the many scenarios that we usually face in our day-to-day tasks. Maybe we want to delete files that are no longer required to save space on our server every once in a while. And what about deleting old backups of the database that are no longer relevant to us? To solve such kinds of problems, you probably heard about something like Cron but what is it and how can we even use it to make our lives easier while also eliminating the possibility of errors that may result in losing our job?
What is Cron?
Cron is a long-running background service process (a Daemon) which executes a set of commands at a specified time defined in a crontab file. Each user has their crontab file which defines all the cron jobs that are meant to be executed at a specific time.
You can further read about Cron and Crontab by typing man cron and man crontab in the terminal. If you are new to Linux, then I would recommend going through my previous article. We won't be going into many details and directly jump to the fun part!
Let's make our first-ever cronjob
Open a terminal and switch to bash shell. (The first thing that we are going to do is check if we already have any cron jobs created for our current user account.)
Type
whoamito check for which user we are going to create a cronjob.Now that we know our current user, Let's see if we have any existing cronjobs for this user. To find that out, Type
crontab -l. So here's something new, Bash shell ignores the lines that start with the#symbol. So they are equivalent to comments. We can define our comments describing what our cron job is meant to do. Now what we can see here is this very file tells us how to declare our commands. Let's Understand the example:0 5 * * 1 tar -zcf /var/backups/home.tgz /home/So this cronjob will run every week on Monday at 5 AM. Below are the valid characters that can be used to construct all the scenarios possible in which we might want to perform our task. It's time to declare our command in this file. To do that,Type
crontab -eto edit the file and type* * * * * cd ~ && ./customScript.shWhat this command does is it switches to the home directory and then executes a script namedcustomScript.shwhich includes the tasks that we want to run. But we did not make this script file yet. So let's make one.Type
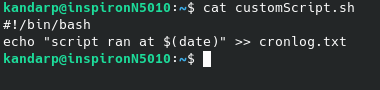
cd ~to switch to the home directory. Then typenano customScript.sh. Copy and paste the text below into the file and save it. (Ctrl + S and then ctrl + x to exit).
#!/bin/bash
echo "script ran at $(date)" >> cronlog.txt
Use cat customScript.sh to check if the changes are made successfully.
customScript.sh is a script file that we just made. What it does is it logs the time at which our cronjob ran in a file named cronlog.txt. But This script is not yet executable. So let's make it executable.
Type
cd ~ && chmod a+x customScript.sh. What we are doing here is making this script executable for all users. (if it seems typical or complicated then refer to my previous article where I explained how we manipulate file permissions.) So now we have to execute permission over the file. If steps were followed correctly you will see a file named cronlog.txt being generated in the home directory. Let's see the contents of the file after letting our cronjob run for a few minutes.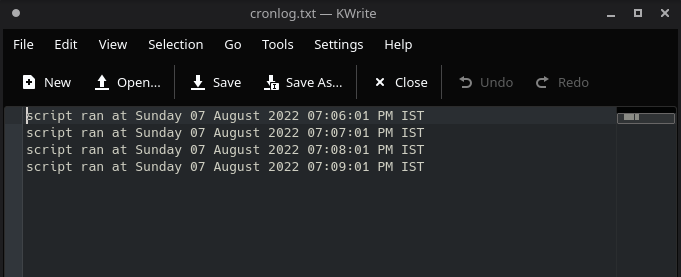
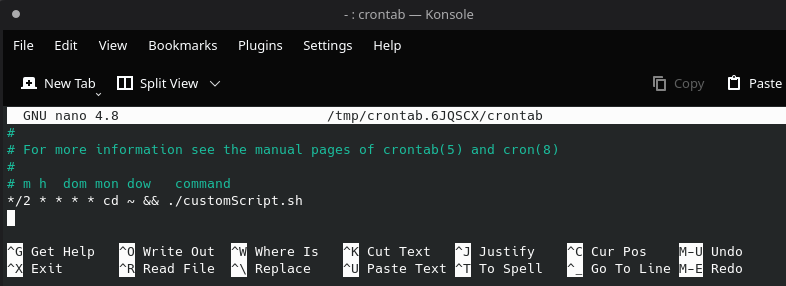
Now let's make a change and make our script run every 2 minutes instead of every minute. To do so we need to edit our crontab file again.
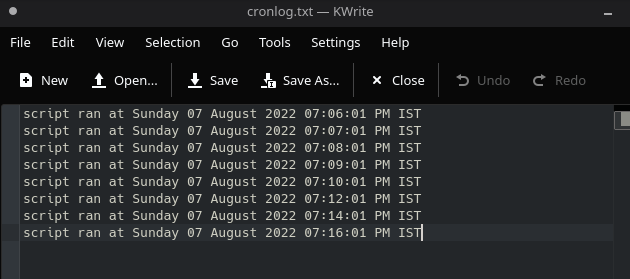
and we get the following results:
Currently, our script doesn't do much but if you understand bash scripting then you can perform way more complicated tasks and literally the sky is the limit. Maybe try making your own Time Trigger Azure Function? Why not?
So In 6 Simple steps, We learnt how to create our own CronJob. Cron Utility service starts automatically from /etc/init.d on entering multi-user runlevels and it reads the commands from the crontab file. How do we stop a cronjob? Just simply remove or comment down the entry in the crontab file and it will no longer run. Now what is /etc/init.d and runlevels. You may search online if you are curious but it's out of the scope of this blog. Maybe we will cover them in our future blogs but the world of Linux is almost infinite and there is a lot to explore!
So follow me, As we will cover lots of interesting topics in upcoming blogs.