

What are Azure functions and Implementing SMS Notification API with Azure

Dedicated full-stack .NET developer and software consultant based in Noida, India. Proficient in crafting robust solutions using ASP .NET Core Web API, SPA, Azure cloud services, minimal APIs, and microservices. Passionate about building products that drive business success and personal growth.
Hello, This is Kandy. Today we are going to understand What are azure functions and how can we use them to create something as basic as an SMS notification system with a scenario under consideration. This is going to be a beginner to intermediate-friendly blog but having any prior knowledge of azure and azure functions is recommended to understand things in a better way. So let's get started.
What is Azure?
Azure is a Cloud platform developed by Microsoft which provides various cloud services such as infrastructure to run your code on, analytics, storage, networking, security and high-level management of resources. Microsoft Azure brings a lot to the table for businesses of every size making it easier for even small businesses to scale globally at an affordable cost or pay-as-you-go. Azure can be compared to cloud platforms such as GCP(Google Cloud Platform), AWS (Amazon web services), Alibaba Cloud, etc and with the services it provides, We can say that azure is here to stay.
The future is Cloud and in this fast-paced world, businesses of all sizes opt for the cloud to build, scale, maintain and manage applications that empower their businesses and make it easier for them to have global reach with reliable Infrastructure and security standards of Microsoft.

What are Azure functions?
Azure Functions is a serverless compute cloud service. Azure functions can be used to build WebAPIs, respond to database changes, process IoT streams, manage message queues, etc. It is like hosting just a piece of code instead of a full-blown web application. Azure functions come with a Pay-as-you-go plan which means you only pay for the compute resources that you use and can help you get started at the minimal cost possible.
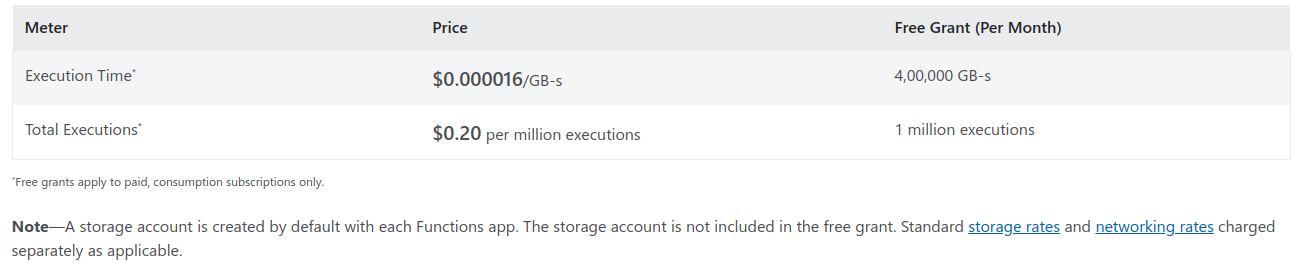
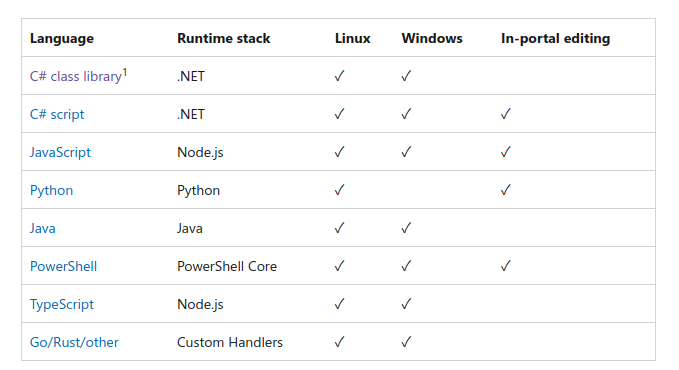
As of 2022, You can have about million executions for just $0.20 which is quite affordable no matter where you live. Azure Functions also support multiple languages depending upon the operating system. While there are some languages for which in-portal code editing is not possible for the time being.
Okay! So now we know a few things about Azure functions, let's Consider a Real Life Scenario where Azure functions might help.
Help a doctor
Meet Dr Roy, A well-known and reputed doctor that runs a medical clinic. Hundreds of patients visit his clinic every day because of which he hired a receptionist. The receptionist gets over a hundred calls where she notes down the name of the patient and allots time slots and days to patients at which they can come for a visit. After that, A day before the appointment, the Receptionist messages all patients to remind them about their medical appointment. It is a tedious and time-consuming task. Dr Roy comes to you and asks If there is a way to build a software-based solution that can manage his business needs. Something like sending SMS to all the patients that have an appointment with just a click of a button. The need for a solution is urgent and Doctor Roy wants himself to be able to send an SMS if the development of a full-fledged solution would take time.
To help Dr Roy, You spun up some azure resources and start to work on a web application. You have a week to come up with a solution.
In this, We will discuss how can we implement a part of an application using Azure functions. We will develop an azure function that will send SMS for appointments to patients.
Send SMS Notification to Patients using Azure functions
In-Portal Approach
Let's create an azure function resource. As you can see here that I have spun up a function app, now we can go to resource.
First let's try to create an azure function using the portal. So we as beginners have a basic idea of how azure functions work.
Create function dialogue box appears, Choose the exact options that we have selected in the screenshot below. we selected HTTP Trigger which runs whenever an HTTP Request is made to the URL of that function. Now all you have to do is click on the created function, go to Code + test, and try it out yourself. It gives you options to edit as well as test your azure function. So play with it a bit. As now we know what are triggers, let's see how can we integrate our function to use Twilio to send SMS.
let's go to the integration tab and add an output binding for Twilio. So What is an output binding? Azure has 2 types of bindings i.e. Input and output bindings. Input bindings are the external resources that work as an input for our function that is needed by the function to compute results such as Blob Storage, Cosmos DB, Table storage, etc. While output bindings are external resources which keep the computed results such as Event Hubs, HTTP (response), Send Grid, Twilio, etc. Here, You need 2 keys which are Twilio SID and Twilio Token. You can fill them right away or just create an output binding for now and change the keys later.
Create a Twilio resource (which is free forever for up to 100 emails per day). But remember that we want to send SMS, But this will come in handy if we want to send emails. Also once the resource is ready, you can configure your Twilio account.
On the Twilio dashboard, we want to opt for the Twilio SMS service.
Here I successfully registered for the Twilio SMS service and on its dashboard, we will get SID, Token and phone number after following some easy steps mentioned in the dashboard.
under code + Test Tab, Select functions.json, and there you can change your SID and Token for Twilio.
Now, all there's left to do is Code. But we want to cover a different approach that would suit developers. For this, we will need
VSCode
Azure plugin for VsCode
Azure CLI
We won't go into detail on how to download and install them. And there are a bunch of tutorials online that explain the same, So let's proceed with our 2nd Approach which is more developer friendly.
VSCode Approach
Before following this approach, It is important to understand the previous approach. So follow through and come back to this later.
open the Azure plugin tab, And create a function app which is a container for all our functions. (before that, It will ask you to log in to azure.)
After creating a function app, Press
ctrl + shift + pand type azure functions and select the option shown in the screenshot below.We want to create an HTTP Trigger, So our web application can hit the URL with the required parameters.
Now, It would run an 8-step process, where you will need to fill in details such as function name and namespace.
Choose access rights as function. As we won't want anonymous access. We only want only the authorized web application with the function token to be able to make a call to our function. (and out-of-the-box Security. Easy!)
Now, We need to add a package for Twilio. To do this press
ctrl + shift + `to open terminal and type:
dotnet add package Microsoft.Azure.WebJobs.Extensions.Twilio
This will add Twilio to your current directory and add a package reference to your project.
- paste the following code into your function code file. In our case, It is TwilioSmsFunction.cs
using System;
using System.IO;
using System.Net.Http;
using System.Threading.Tasks;
using Microsoft.AspNetCore.Mvc;
using Microsoft.Azure.WebJobs;
using Microsoft.Azure.WebJobs.Extensions.Http;
using Microsoft.AspNetCore.Http;
using Microsoft.Extensions.Logging;
using Newtonsoft.Json;
using Twilio.Rest.Api.V2010.Account;
using Twilio.Types;
namespace Kandy.Twilio
{
    public static class TwilioSmsFunction
    {
        [FunctionName("TwilioSmsFunction")]
        public static async Task<IActionResult> Run([HttpTrigger(AuthorizationLevel.Function,  "post", Route = null)] HttpRequest req,ILogger log,
        [TwilioSms(AccountSidSetting = "TwilioAccountSid",AuthTokenSetting = "TwilioAuthToken")] ICollector<CreateMessageOptions> messageCollector)
        {
            log.LogInformation($"SendSmsTimer executed at: {DateTime.Now}");
            string toPhoneNumber = Environment.GetEnvironmentVariable("ToPhoneNumber", EnvironmentVariableTarget.Process);
            string fromPhoneNumber = Environment.GetEnvironmentVariable("FromPhoneNumber", EnvironmentVariableTarget.Process);
            string requestBody = String.Empty;
            using (StreamReader streamReader =  new  StreamReader(req.Body))
            {
                requestBody = await streamReader.ReadToEndAsync();
            }
            dynamic data = JsonConvert.DeserializeObject(requestBody);
            string name ="";
            name = data?.name;
            string time = "";
            time = data?.time;
            var message = new CreateMessageOptions(new PhoneNumber(toPhoneNumber))
            {
                From = new PhoneNumber(fromPhoneNumber),
                Body = $"Hello {name}, This is a reminder that you have your medical appointment at {time}."
            };
            messageCollector.Add(message);
            return new OkObjectResult("sms sent successfully!");
        }
    }
}
Let's understand important parts of the code.
- we included the Twilio namespaces that we require.
using Twilio.Rest.Api.V2010.Account;
using Twilio.Types;
- our function signature looks like so. We want to only respond to HTTP POST Requests. The authorization level would be function. This means we will need a function token to make a call to this function. we have our Twilio SID and Token that we are getting from local.settings.json. Our output binding Icollector of type CreateMessageOptions (coming from Twilio packages) as we might want to return multiple SMS. And finally, logger to log execution time. All this is possible with the help of an important concept i.e. Dependency Injection.
  public static async Task<IActionResult> Run([HttpTrigger(AuthorizationLevel.Function,  "post", Route = null)] HttpRequest req,ILogger log,
        [TwilioSms(AccountSidSetting = "TwilioAccountSid",AuthTokenSetting = "TwilioAuthToken")] ICollector<CreateMessageOptions> messageCollector)
I won't we explaining the code to you, You can experiment and understand how it's working. Simply we are getting the names of patients and timeslots from the app that is making a call to our function. And patient number currently we are getting from the environment variable but in real-life scenarios, we would want to get it from the database but because we are using a Free trial, we cannot send SMS to anyone we want just yet. So I will be using my registered number.
Final Step, Let's Test our function locally
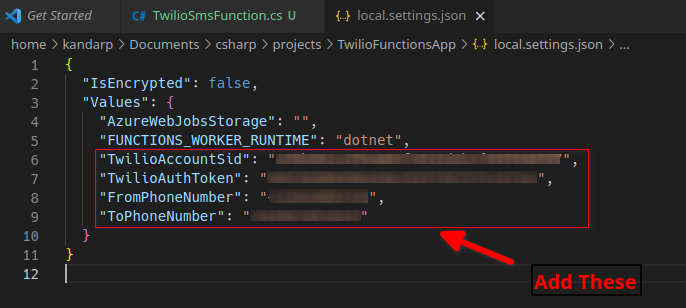
let's configure our keys in local.settings.json. Now if you followed the In-portal approach, You will know how to get this information.
Let's run our project by pressing ctrl + F5 we will see the function URL in the console, and copy it. Open postman, and follow the instructions in the screenshot below.
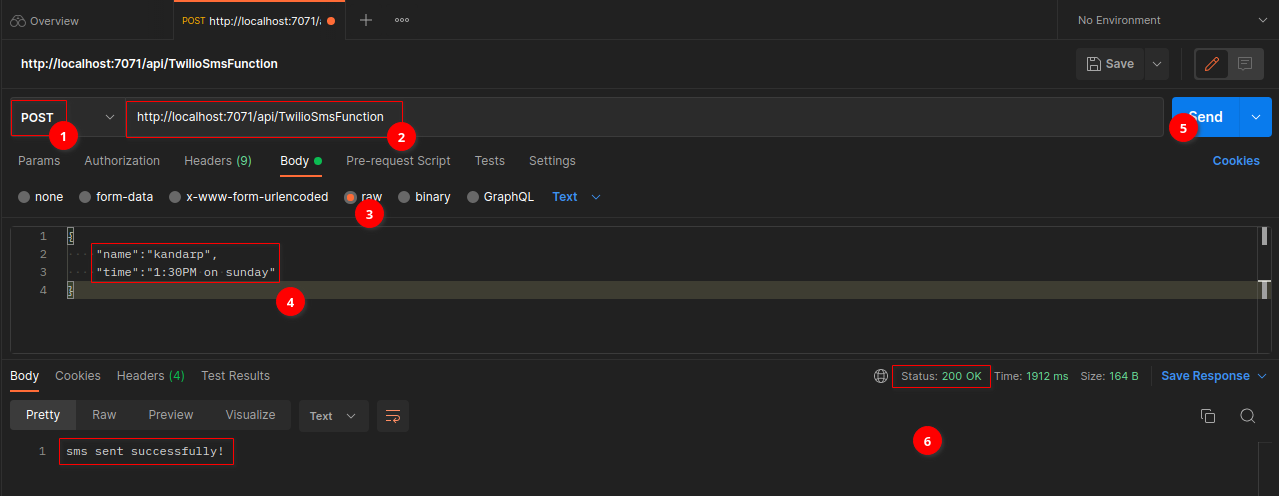
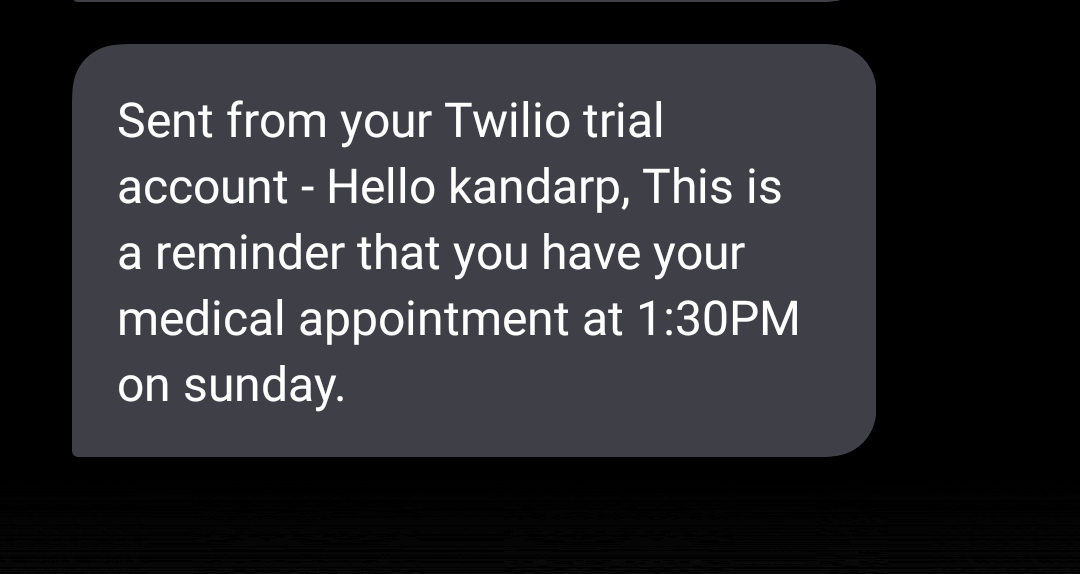
As you can see we got a successful response with our custom response message. And we also receive SMS on our phone number.
Perfect, Now It's ready to be deployed!
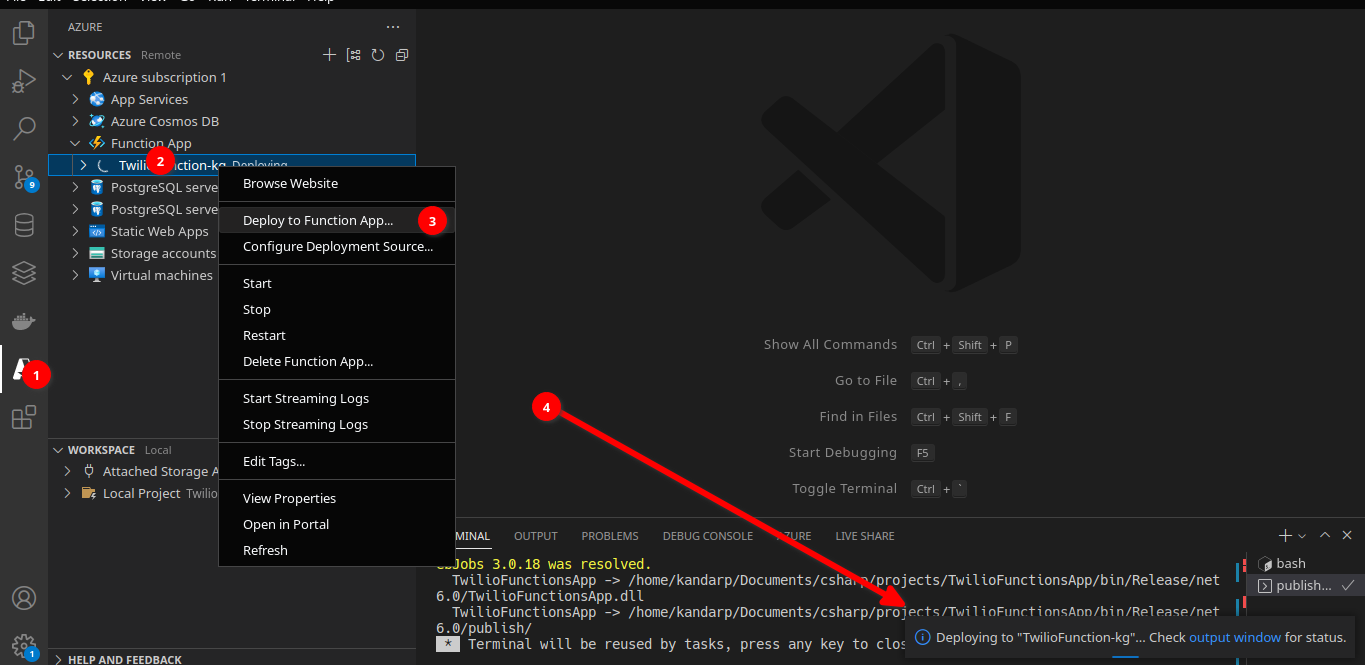
Now deployment would be successful and our function is ready to be used!
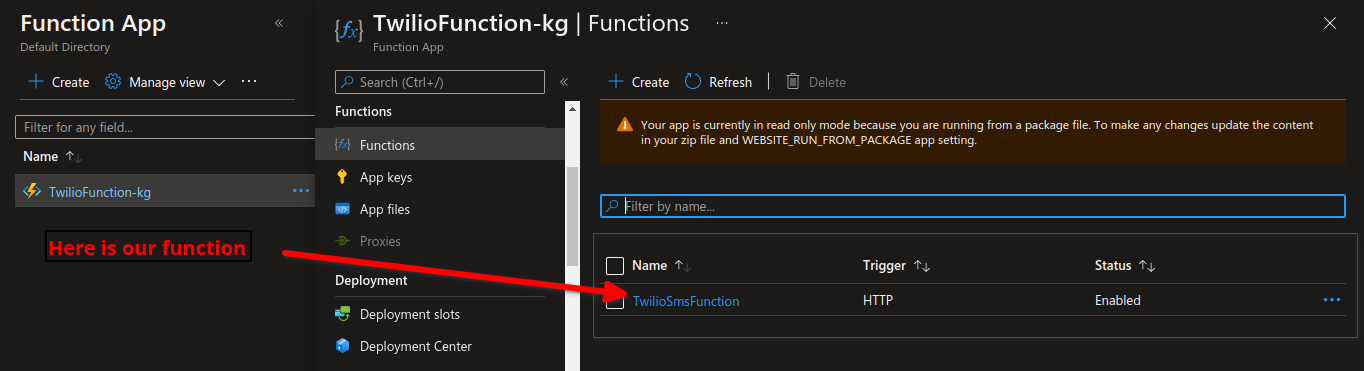
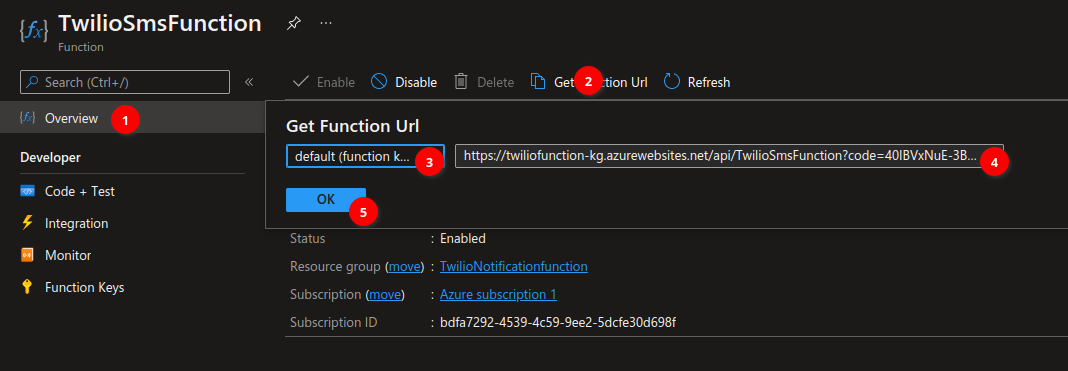
We can go to Overview to get the function URL so we can use it in our app. It could be web, android or IOS. It doesn't matter, It works like an API which integrates with any platform.
Great! You made it till the end!
If you made it until here then you have reached the end of the blog. If you learnt something new, Then Follow. There will be more interesting blogs coming. I will catch up with you in my next blog.
Till then keep exploring and keep learning!